


How to deploy your react app to AWS S3 and CloudFront
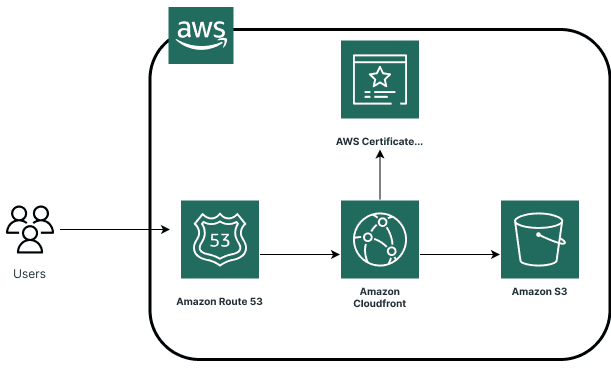
Amazon Web Services (AWS) offers a robust global infrastructure to host and serve web applications. In this guide, we'll walk you through deploying your Single Page Application (SPA) React app using AWS S3 and CloudFront, leveraging AWS's robust backbone network and CloudFront's edge servers.
Introducing AWS S3
Amazon Simple Storage Service (S3) is an object storage service that offers industry-leading scalability, data availability, security, and performance.
S3 is designed for 99.999999999% (11 9's) of durability, and stores data for millions of applications used by market leaders in every industry.
It allows you to store and retrieve any amount of data at any time, from anywhere on the web, making it an ideal choice for hosting static websites and web applications like those built with React.
Setting Up Your React App on AWS S3
Build Your React App: First, prepare your React application for deployment. Run npm run build to create a production build of your app.
Create an S3 Bucket: Log into your AWS Management Console, navigate to the S3 service, and create a new bucket. Ensure that your bucket name is unique and that the option to block all public access is unchecked since your website will be publicly accessible.
Configure Bucket for Website Hosting: Once your bucket is created, enable static website hosting in the bucket's properties. You'll specify index.html as both the index and error documents.
Upload Your App: Upload the contents of the build folder generated by React into your S3 bucket. Ensure that the permissions are set to public so that the files can be accessed over the internet.
Secure Your Bucket: Although your website is public, securing your bucket is crucial to prevent unauthorized access. Use AWS Identity and Access Management (IAM) policies to manage access.
Introducing CloudFront
Amazon CloudFront is a fast content delivery network (CDN) service that securely delivers data, videos, applications, and APIs to customers globally with low latency and high transfer speeds. CloudFront is integrated with AWS – both physically and via the AWS network backbone – to give you an easy way to distribute content to your users with low latency and high data transfer speeds.
Deploying Your App with CloudFront
Create a CloudFront Distribution: Go to the CloudFront console and create a new distribution. Select your S3 bucket as the origin. Remember to specify the same S3 bucket you used to upload your React app.
Configure Settings: Choose the settings based on your requirements. For a React app, make sure to handle custom error responses. You may want to set up a custom error response for 404 errors to redirect to index.html with a 200 status code, ensuring smooth SPA navigation.
SSL and Custom Domain: CloudFront offers a free SSL/TLS certificate, which you can use to serve your content over HTTPS. Additionally, if you have a custom domain, you can configure it in CloudFront and use AWS Route 53 to point your domain to your CloudFront distribution.
Introducing AWS Route 53
AWS Route 53 is a scalable and highly available Domain Name System (DNS) web service. It's designed to give developers an extremely reliable and cost-effective way to route end users to Internet applications hosted on AWS.
Route 53 can be easily integrated with AWS services like CloudFront, making it simple to set up DNS records to route traffic to your CDN.
Linking AWS Route 53 to CloudFront
Create a Hosted Zone: In the Route 53 console, create a new hosted zone for your domain.
This will generate four DNS servers that you'll need to update in your domain registrar's settings.
Create Record Sets: Within your hosted zone, create record sets pointing to your CloudFront distribution. For a basic setup, you'll need an A record using an Alias that points to your CloudFront distribution domain name.
Update Domain Registrar: Update the DNS settings at your domain registrar to use the DNS servers provided by Route 53. This ensures that your domain properly routes traffic to your CloudFront distribution.
Continuous Integration and Deployment with GitHub Actions
By setting up a workflow for your React app, you can automatically build, test, and deploy your project to AWS S3 and invalidate your CloudFront distribution cache, ensuring users always have access to the latest version of your app.
Setting Up GitHub Actions for Your React App
Create a GitHub Workflow: In your project repository, create a .github/workflows directory if it doesn't already exist. Within this directory, create a YAML file for your workflow, for example, deploy.yml.
Configure AWS Credentials: To allow GitHub Actions to deploy your app to AWS, you'll need to configure your AWS credentials as secrets in your GitHub repository settings. Go to Settings > Secrets and add your AWS Access Key ID and AWS Secret Access Key as AWS_ACCESS_KEY_ID and AWS_SECRET_ACCESS_KEY, respectively.
Define Your Workflow: In your deploy.yml file, define the steps of your CI/CD process. Here's a simple workflow that installs dependencies, builds your React app, and deploys the build to AWS S3, followed by an invalidation of the CloudFront distribution:
name: Deploy React App to AWS S3 and CloudFront

on:
  push:
    branches:
      - main  # or your default branch

jobs:
  deploy:
    runs-on: ubuntu-latest
    steps:
    - uses: actions/checkout@v2

    - name: Set up Node.js
      uses: actions/setup-node@v1
      with:
        node-version: '14'  # Set this to your node version

    - name: Install dependencies
      run: npm install

    - name: Build
      run: npm run build

    - name: Deploy to AWS S3
      uses: jakejarvis/s3-sync-[email protected]
      with:
        args: --acl public-read --follow-symlinks --delete
      env:
        AWS_S3_BUCKET: ${{ secrets.AWS_S3_BUCKET }}  # Your S3 Bucket name
        AWS_ACCESS_KEY_ID: ${{ secrets.AWS_ACCESS_KEY_ID }}
        AWS_SECRET_ACCESS_KEY: ${{ secrets.AWS_SECRET_ACCESS_KEY }}
        AWS_REGION: 'us-east-1'  # Your AWS Region
        SOURCE_DIR: './build'

    - name: Invalidate CloudFront Distribution
      uses: chetan/invalidate-cloudfront-action@v1
      env:
        DISTRIBUTION_ID: ${{ secrets.DISTRIBUTION_ID }}  # Your CloudFront distribution ID
        AWS_ACCESS_KEY_ID: ${{ secrets.AWS_ACCESS_KEY_ID }}
        AWS_SECRET_ACCESS_KEY: ${{ secrets.AWS_SECRET_ACCESS_KEY }}
PATHS: '/' # Paths to invalidate, typically '/'- Finalize and Push: After setting up your workflow file, push it to your repository. GitHub Actions will automatically run the workflow whenever you push changes to the specified branch, ensuring your React app is always up to date.
Obtaining AWS Credentials for GitHub Actions
For your GitHub Actions workflows to interact with AWS services, such as deploying your React app to S3 or invalidating a CloudFront distribution, you'll need to provide AWS credentials with the necessary permissions. Here's how you can create and configure these credentials securely.
Step 1: Creating an IAM User
Log into the AWS Management Console and navigate to the IAM (Identity and Access Management) service.
Create a New IAM User:
Choose Users from the navigation pane and click Add user. Provide a user name (e.g., github-actions) and select Programmatic access as the access type. This creates an access key ID and secret access key for the AWS CLI, SDKs, and other development tools.
Attach Policies:
To grant the necessary permissions for deploying to S3 and invalidating CloudFront distributions, attach the AmazonS3FullAccess and CloudFrontFullAccess policies. You can also create a custom policy with more restricted permissions tailored to your specific needs. It's a best practice to adhere to the principle of least privilege, granting only the permissions necessary for the tasks your GitHub Actions will perform. Review and Create the User:
Review your settings and click Create user. After the user is created, you'll be provided with an access key ID and secret access key. Make sure to download and securely save these credentials, as the secret access key cannot be retrieved again after this step.
Step 2: Configuring Secrets in GitHub
Navigate to Your GitHub Repository where your React app is located.
Access the Repository Settings: Click on Settings > Secrets > Actions.
Add Your AWS Credentials:
Click on New repository secret. Enter AWS_ACCESS_KEY_ID as the name and paste the IAM user's access key ID as the value. Repeat the process to add another secret, AWS_SECRET_ACCESS_KEY, with the secret access key as its value. (Optional) Additional Secrets:
If your GitHub Actions workflow needs to specify an S3 bucket name, CloudFront distribution ID, or any other AWS resource identifiers, you can add them as secrets in the same way.
Step 3: Using the Secrets in Your GitHub Actions Workflow
In your GitHub Actions workflow file (e.g., deploy.yml), you can now reference these secrets using the ${{ secrets.NAME }} syntax, ensuring your workflow has the necessary permissions to perform actions on AWS without hardcoding sensitive information:
env:
  AWS_ACCESS_KEY_ID: ${{ secrets.AWS_ACCESS_KEY_ID }}
  AWS_SECRET_ACCESS_KEY: ${{ secrets.AWS_SECRET_ACCESS_KEY }}
  # Add other AWS resource identifiers as needed


