


Introduction
While third-party authentication services like Google Firebase, AWS Cognito, and Auth0 are gaining popularity, and all-in-one library solutions like passport.js are the industry standard, is common to see that developers never really understand all the parts involved in the authentication flow.
This series of articles about node.js authentication, are aimed to demystify concepts such as JSON Web Token (JWT), social login (OAuth2), user impersonation (an admin can log in as a specific user without password), common security pitfalls and attack vectors.
Also, there is a GitHub repository with a complete node.js authentication flow that you can use as a base for your projects.
Table of contents
- Requirements ✍️
- How to make the Sign-Up 🥇
- How to make the Sign-In 🥈
- JWT explained 👩🏫
- Generating JWTs 🏭
- Secured endpoints ⚔️
- User impersonation 🕵️
- Conclusion 🏗️
- Example repository 🔬
Project requirements ✍️
The requirements for this project are:
A database to store the user's email and password, or clientId and clientSecret, or any pair of public and private keys.
A strong and efficient cryptographic algorithm to encrypt the passwords.
At the time of writing, I consider that Argon2 is the best cryptographic algorithm out there, please don't use a simple cryptographic algorithm like SHA256, SHA512 or MD5.
Please refer to this awesome post for more details about choosing a password hashing algorithm
How to create a Sign-Up 🥇
When a user is created, the password has to be hashed and stored in the database alongside the email and other custom details (user profile, timestamp, etc)
Note: Read about the node.js project structure in the previous article Bulletproof node.js project architecture 🛡️
import * as argon2 from 'argon2';

class AuthService {
  public async SignUp(email, password, name): Promise<any> {
    const passwordHashed = await argon2.hash(password);

    const userRecord = await UserModel.create({
      password: passwordHashed,
      email,
      name,
    });
    return {
      // MAKE SURE TO NEVER SEND BACK THE PASSWORD!!!!
      user: {
        email: userRecord.email,
        name: userRecord.name,
      },
    }
  }
}
The user record looks like this:

How to create a Sign-In 🥈

When the user performs a sign in, this is what happens:
The client sends a pair of Public Identification and a Private key, usually an email and a password
The server looks for the user in the database using the email.
If the user exists in the database, the server hashes the sent password and compares it to the stored hashed password
If the password is valid, it emits a JSON Web Token (or JWT)
This is the temporary key that the client has to send in every request to an authenticated endpoint
import * as argon2 from 'argon2';

class AuthService {
  public async Login(email, password): Promise<any> {
    const userRecord = await UserModel.findOne({ email });
    if (!userRecord) {
      throw new Error('User not found')
    } else {
      const correctPassword = await argon2.verify(userRecord.password, password);
      if (!correctPassword) {
        throw new Error('Incorrect password')
      }
    }

    return {
      user: {
        email: userRecord.email,
        name: userRecord.name,
      },
      token: this.generateJWT(userRecord),
    }
  }
}
The password verification is performed using the argon2 library to prevent 'timing-based attacks', which means, when an attacker tries to brute-force a password based in the solid principle of how much time takes the server to respond.
In the next section, we will discuss how to generate a JWT
But, what is a JWT anyway? 👩🏫
A JSON Web Token or JWT is an encoded JSON object, in a string or Token.
You can think it as a replacement of a cookie, with several advantages.
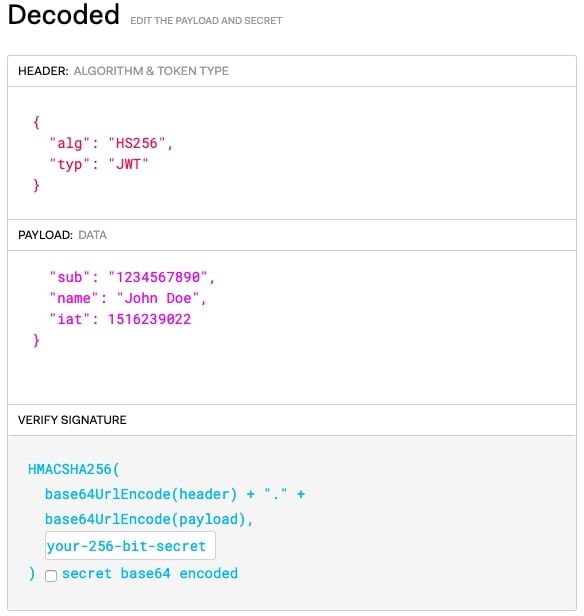
The token has 3 parts and looks like this:
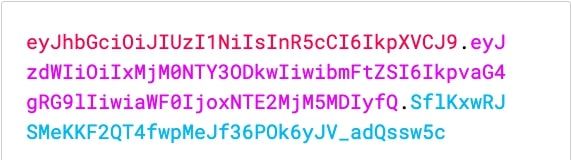
The data of the JWT can be decoded in the client side without the Secret or Signature.
This can be useful to transport information or metadata, encoded inside the token, to be used in the frontend application, such as things like the user role, profile, token expiration, and so on.
How to generate JWT in node.js 🏭
Let's implement the generateToken function needed to complete our authentication service
By using the library jsonwebtoken, that you can find in npmjs.com, we are able to generate a JWT.
import * as jwt from 'jsonwebtoken'
class AuthService {
  private generateToken(user) {

    const data =  {
      _id: user._id,
      name: user.name,
      email: user.email
    };
    const signature = 'MySuP3R_z3kr3t';
    const expiration = '6h';

    return jwt.sign({ data, }, signature, { expiresIn: expiration });
  }
}
The important here is the encoded data, you should never send sensitive information about the user.
The signature is the 'secret' that is used to generate the JWT, and is very important to keep this signature safe.
If it gets compromised, an attacker could generate tokens on behalf the users and steal their sessions.
Securing endpoints and verifying the JWT ⚔️
The frontend code is now required to send the JWT in every request to a secure endpoint.
A good practice is to include the JWT in a header, commonly the Authorization header.

Now in the backend, a middleware for the express routes has to be created.
Middleware "isAuth"
import * as jwt from 'express-jwt';

// We are assuming that the JWT will come in the header Authorization but it could come in the req.body or in a query param, you have to decide what works best for you.
const getTokenFromHeader = (req) => {
  if (req.headers.authorization && req.headers.authorization.split(' ')[0] === 'Bearer') {
    return req.headers.authorization.split(' ')[1];
  }
}

export default jwt({
  secret: 'MySuP3R_z3kr3t', // Has to be the same that we used to sign the JWT

  userProperty: 'token', // this is where the next middleware can find the encoded data generated in services/auth:generateToken -> 'req.token'

  getToken: getTokenFromHeader, // A function to get the auth token from the request
})
Is very useful to have a middleware to get the complete current user record, from the database, and attach it to the request.
export default (req, res, next) => {
 const decodedTokenData = req.tokenData;
 const userRecord = await UserModel.findOne({ _id: decodedTokenData._id })

  req.currentUser = userRecord;

 if(!userRecord) {
   return res.status(401).end('User not found')
 } else {
   return next();
 }
}
Now the routes can access the current user that is performing the request.
  import isAuth from '../middlewares/isAuth';
  import attachCurrentUser from '../middlewares/attachCurrentUser';
  import ItemsModel from '../models/items';

  export default (app) => {
    app.get('/inventory/personal-items', isAuth, attachCurrentUser, (req, res) => {
      const user = req.currentUser;

      const userItems = await ItemsModel.find({ owner: user._id });

      return res.json(userItems).status(200);
    })
  }
The route 'inventory/personal-items' is now secured, you need to have a valid JWT to access it, but also it will use the current user from that JWT to look up in the database for the corresponding items.
Why a JWT is secured ?
A common question that you may have after reading this is:
If the JWT data can be decoded in the client side, can a JWT be manipulated in a way to change the user id or other data ?
While you can decode a JWT easily, you can not encode it with new data without having the 'Secret' that was used when the JWT was signed.
This is the why is so important to never disclose the secret.
Our server is checking the signature on the middleware IsAuth the library express-jwt takes care of that.
Now that we understand how a JWT works, let's move on to a cool advance feature.
How to impersonate a user 🕵️
User impersonation is a technique used to sign in as a specific user, without knowing the user's password.
This a very useful feature for the super admins, developers or support, to be able to solve or debug a user problem that is only visible with his session.
There is no need in having the user password to use the application on his behalf, just generate a JWT with the correct signature and the required user metadata.
Let's create an endpoint that can generate a JWT to log in as a specific user, this endpoint will only be able to be used by a super-admin user
First, we need to establish a higher role for the super admin user, there are many ways to do it, a simple one is just to add a 'role' property on the user record in the database.

Second, let's create a new middleware that checks the user role.
export default (requiredRole) => {
  return (req, res, next) => {
    if(req.currentUser.role === requiredRole) {
      return next();
    } else {
      return res.status(401).send('Action not allowed');
    }
  }
}
That middleware needs to be placed after the isAuth and attachCurrentUser middlewares.
Third, the endpoint that generates a JWT for the user to impersonate.
  import isAuth from '../middlewares/isAuth';
  import attachCurrentUser from '../middlewares/attachCurrentUser';
  import roleRequired from '../middlwares/roleRequired';
  import UserModel from '../models/user';

  export default (app) => {
    app.post('/auth/signin-as-user', isAuth, attachCurrentUser, roleRequired('super-admin'), (req, res) => {
      const userEmail = req.body.email;

      const userRecord = await UserModel.findOne({ email: userEmail });

      if(!userRecord) {
        return res.status(404).send('User not found');
      }

      return res.json({
        user: {
          email: userRecord.email,
          name: userRecord.name
        },
        jwt: this.generateToken(userRecord)
      })
      .status(200);
    })
  }
So, there is no black magic here, the super-admin knows the email of the user that wants to impersonate, and the logic is pretty similar to the sign-in, but there is no check for correctness of password.
That's because the password is not needed, the security of the endpoint comes from the roleRequired middleware.
Conclusion 🏗️
While is good to rely on third-party authentication services and libraries, to save development time, is also necessary to know the underlayin logic and principles behind authentication.
In this article we explored the JWT capabilities, why is important to choose a good cryptographic algorithm to hash the passwords, and how to impersonate a user, something that is not so simple if you are using a library like passport.js.
In the next part of this series, we are going to explore the different options to provide 'Social Login' authentication for our customers by using the OAuth2 protocol and an easier alternative, a third-party authentication provider like Firebase.


